
2017慧都十四周年狂欢搞事情,全场产品折扣风暴来袭!砸金蛋100%抽现金红包、满额豪送iPhone X、iPhone 8、DevExpress汉化免费送、团队升级培训套包劲省10万元......更多惊喜等您来探索!

2003年11月,慧都破茧而出;
2017年11月,慧都已崛世而立。
14岁了,搞件大事情——创造折扣奇迹!
这个狂欢月,就要躁!起!来!
七大玩法,花样玩赚周年趴!
狂欢时间:2017.11.1-2017.11.30
 下单即送砸金蛋机会 100%抽微信现金红包 188元、88元、18元等你领取!
| |
全场满额豪送iPhone X! --------------------- 购买慧都任意产品 满额即送8级好礼 iPhone X、iPhone8速速领走! | DevExpress庆周年 --------------------- DevExpress汉化资源免费送 DEV团队培训套包 最高立省10万元
|
慧都学院培训“拼拼团” --------------------- 不要998!不要888! 只要1分钱! 立抢DevExpress/Kendo UI研修班团购优惠名额! |
全场热销产品7折起 --------------------- Kendo UI、Aspose、BCGSoft、Dynamsoft等产品 超低折扣等你来! 葡萄城GrapeCity更享专属折扣 |
在线商城 聚惠再续 --------------------- MyEclipse个人授权低至6.9折! 在线订购商城全场优惠促销 下单还送砸金蛋机会 | 周年送祝福 好礼齐掉落 --------------------- 您送祝福,我送好礼 提交周年祝福、评价等 随机获取定制台历、保温杯或雨伞! |
关注的产品没在促销活动中?不用担心,点击咨询在线客服有意想不到的惊喜哦!
今年5月的WannaCry(勒索软件)已经让大家尝尽苦头也让网络安全系统管理员的颜面尽扫。目前来说,安全专家们仍然无法预料WannaCry(勒索软件)将会出现何种变种。对于拥有专门的安全专家的大公司来说,网络安全最起码还有个基本的保障,但对个人用户来说,就只能靠自己来进行防护了。
在这里为大家提供6条加强你的网络环境的建议,这6条建议对组织和个人用户来说,都非常有用,且易于操作。
密码重用的常见原因是Windows工作站和服务器上的本地管理员帐户,这些密码通常通过组策略设置为公用值,或者在构建系统映像时设置为标准值。因此,在一台机器上发现本地管理员密码的攻击者就可以利用这些值访问网络上的所有计算机。
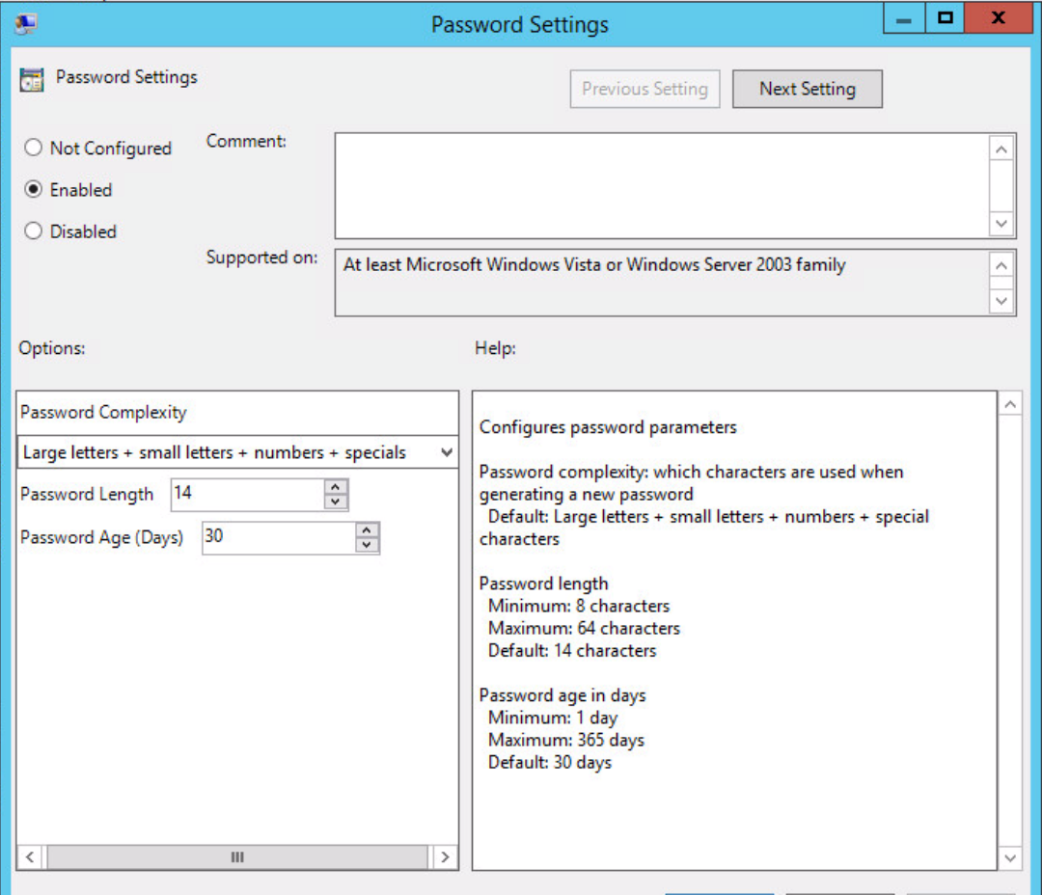
在2015年年中,微软发布了一个解决这个该问题的工具,即本地管理员密码解决方案(LAPS)。此方案是将本地管理员密码存储在LDAP上,作为计算机账户的一个机密属性,配合GPO,实现自动定期修改密码、设置密码长度、强度等,更重要是该方案可以将该密码作为计算机帐户属性存储在Active Directory中。该属性“ms-Mcs-AdmPwd”可以通过ACL锁定,以确保只有经过批准的用户,如控制台和系统管理员可以查看密码。 LAPS还包括一个PowerShell模块和一个后台客户端,LAPS UI,以简化管理和检索过程。
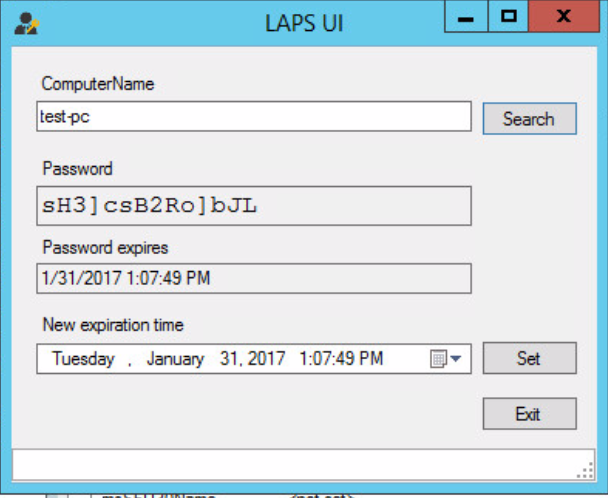
LAPS实现起来非常快速简单,只需要要求系统管理员创建一个定义密码策略和本地帐户名称的GPO来管理,可以直接将单个文件AdmPwd.dll添加到Windows上。
攻击者对具有漏洞的账户进行控制一样可以获得该设备的管理权限,比如用户有时会为了某种访问的需要,进行一些临时访问,但在访问完毕后,用户有时会忘了对这些访问进行删除或监控,以至于被黑客利用。根据我们的经验,很少有用户会把这些临时访问权限进行删除。
敏感帐户,如具有管理员权限的帐户应与普通账户,如员工的账户在查看电子邮件和浏览网页时进行帐户区分。如果用户帐户被恶意软件或网络钓鱼进行了攻击,或者在密码已被泄密的情况下,帐户区分将有助于防止对管理员的权限造成进一步损坏。
具有域管理员或企业管理员资格的帐户应受到高度限制,比如只能用于登录域控制器,具有这些权限的帐户不应再在其他系统上进行登录了。在此,我们建议大家可以基于不同的管理功能来为每个账户设置不同的权限的管理账户,比如 “工作站管理”和“服务器管理”组,这样每个管理员就不具有访问整个域的权限了,这将有助于对整个域的权限保护。
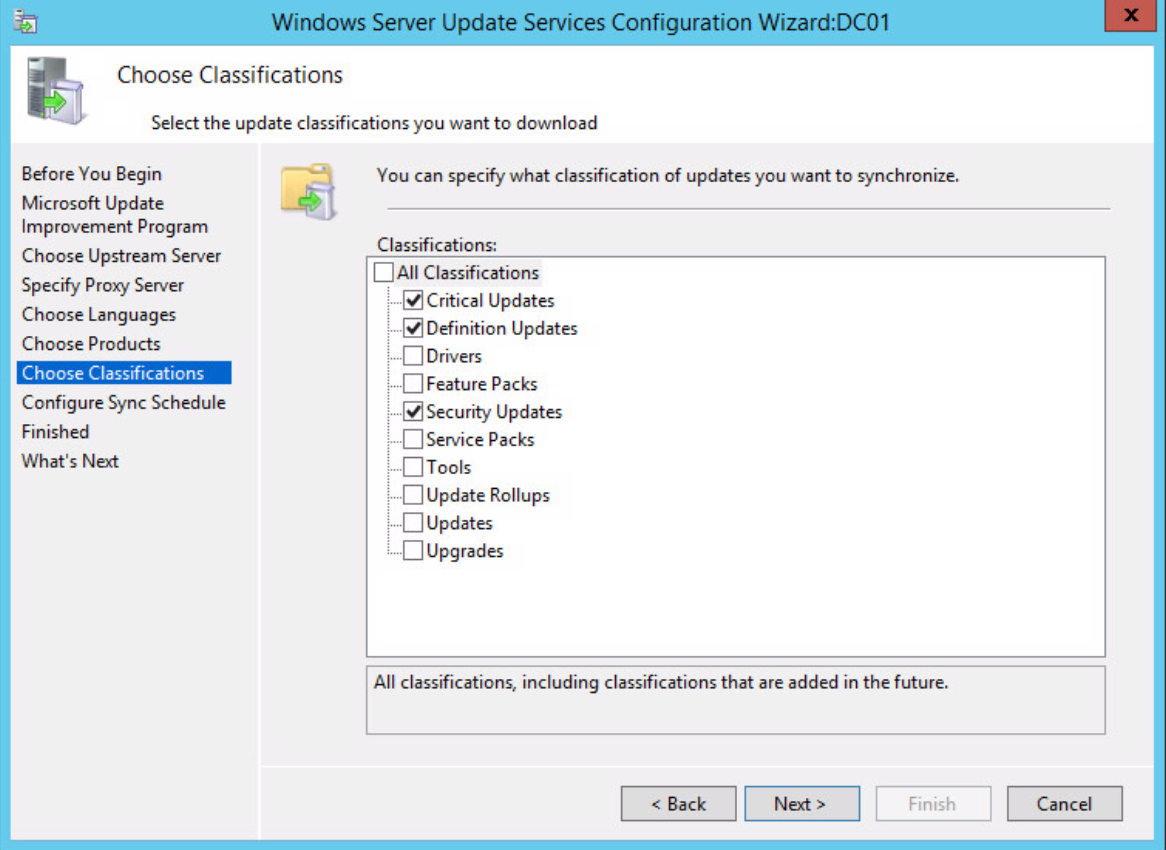
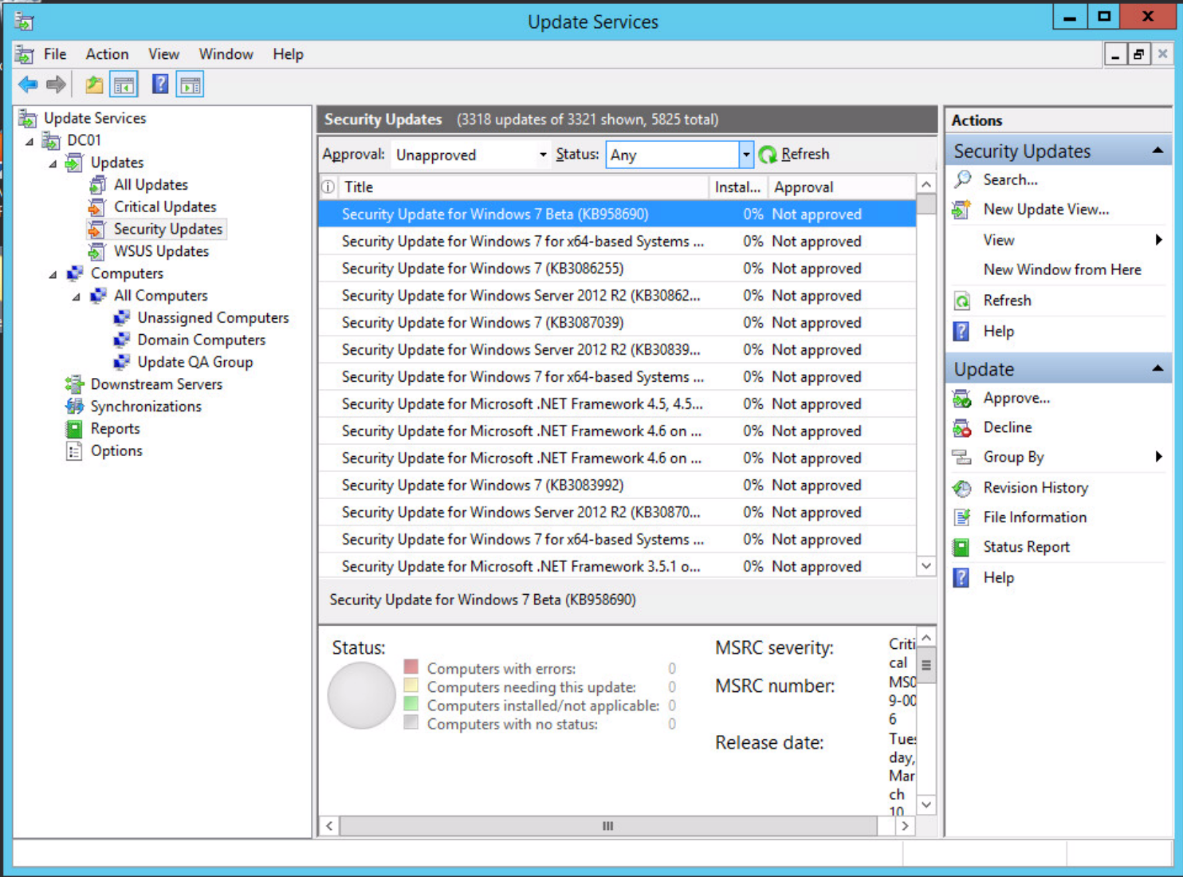
许多攻击包括WannaCry的基本攻击机制,都是针对未修补的系统。所以,不管你的网络是否对外开放,都应该定期更新操作系统和应用程序。虽然这个建议属于老生常谈,但从另一个侧面也说明了该建议的重要性。许多攻击就是利用未修复的漏洞和未更新的系统来大做文章。
对于Windows系统来说,利用Windows Server进行更新服务简单而高效。利用WSUS部署更新程序时,WSUS易于设置,可以设置为自动或手动方式。而利用第三方软件来管理更新就有点不靠谱了,比如一些商业插件就允许WSUS从其他供应商那里修补软件。还有一些比较小众的工具,像Ninite这样的第三方更新工具,既不是自动配置的,也不是免费使用的,但它允许用户从其列表中选择支持的应用程序和运行没有完全选定的应用程序。 Flexera的企业软件检查器和Microsoft的系统中心配置管理器(SCCM)等工具也可以帮助管理第三方应用程序的修补。
Verizon发布的《2016年数据泄露调查报告》显示“63%的已确认的数据泄露事件均涉及到密码口令(password)的丢失、密码口令安全性过低或默认密码未
更改”,所以这个建议是非常重要的。当用户在首次使用设备时,应该先对默认的出厂密码进行修改,如果没有设置密码的要先设置密码,但往往人们会忽
略这些关键的保护手段。攻击者就是利用这些疏忽来进行攻击的,因为一般的出厂默认密码都可以在网络上查到。攻击者可以利用网络设备,如交换机和接
入点上的默认密码来重定向流量,执行中间人攻击,或对网络基础设施执行拒绝服务攻击。
更糟糕的是,内部系统所利用的Web控制台在包含敏感业务数据或系统配置的应用程序中通常使用的都是默认密码。攻击者利用网络钓鱼和常见的恶意软
件的攻击向量就可以绕过安全防护,并且有时候真正的威胁是来自内部人员的恶意行为,所以借着 “内部”这个借口来放松对密码的管理,这个观念是非
常错误的。正确的做法应该是,审核所有登录密码,并进行必要的修改和设置。现在,许多设备和服务都支持双因素身份验证, 建议大家尽量开启。

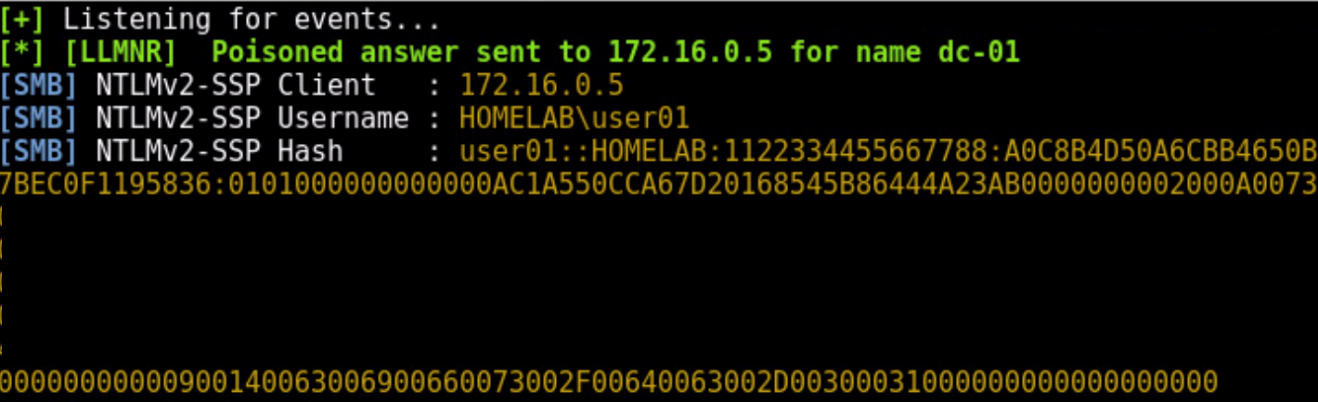
链路本地组播名称解析(LLMNR)和NetBIOS名称服务(NBT-NS)都可以导致在启用时快速对域名进行攻击。这些协议最常用在初始DNS查找失败时查找所请求的主机,并且会在默认情况下启用。在大多数网络中,由于DNS的存在,所以LLMNR和NetBIOS名称解析根本就没有必要再用了。当对无法找到的主机发出请求时,例如尝试访问 dc-01的用户打算输入 dc01,LLMNR和NBT-NS就会发送广播,寻找该主机。这时攻击者就会通过侦听LLMNR和NetBIOS广播,伪装成用户(客户端)要访问的目标设备,从而让用户乖乖交出相应的登陆凭证。在接受连接后,攻击者可以使用Responder.py或Metasploit等工具将请求转发到执行身份验证过程的流氓服务(如SMB TCP:137)。 在身份验证过程中,用户会向流氓服务器发送用于身份认证的NTLMv2哈希值,这个哈希值将被保存到磁盘中,之后就可以使用像Hashcat或John Ripper(TJR)这样的工具在线下破解,或直接用于 pass-the-hash攻击。
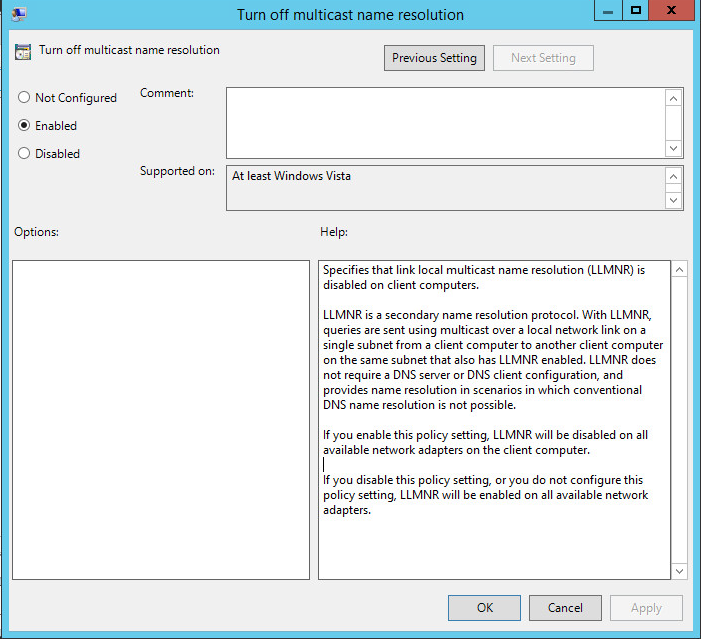
由于这些服务通常不是必需的,因此最简单的措施是完全禁用它们。大家可以顺着计算机配置 – >策略 – >管理模板 – >网络 – > DNS客户端 – >关闭组播名称解析来修改组策略,禁用LLMNR。
禁用NetBIOS名称解析并不是一件简单的事情,因为我们必须在每个网络适配器中手动禁用“启用TCP / IP NetBIOS”选项,或者运行包含以下wmic命令的脚本:
wico nicconfig其中TcpipNetbiosOptions = 0调用SetTcpipNetbios 2
wmic nicconfig其中TcpipNetbiosOptions = 1调用SetTcpipNetbios 2
不过要注意的是,虽然这些服务通常不是必需的,但一些过去的老软件仍然可以依靠NetBIOS名称解析来正常运行。在运行GPO之前,请务必测试以下禁用这些服务会对你的运行环境有哪些影响。
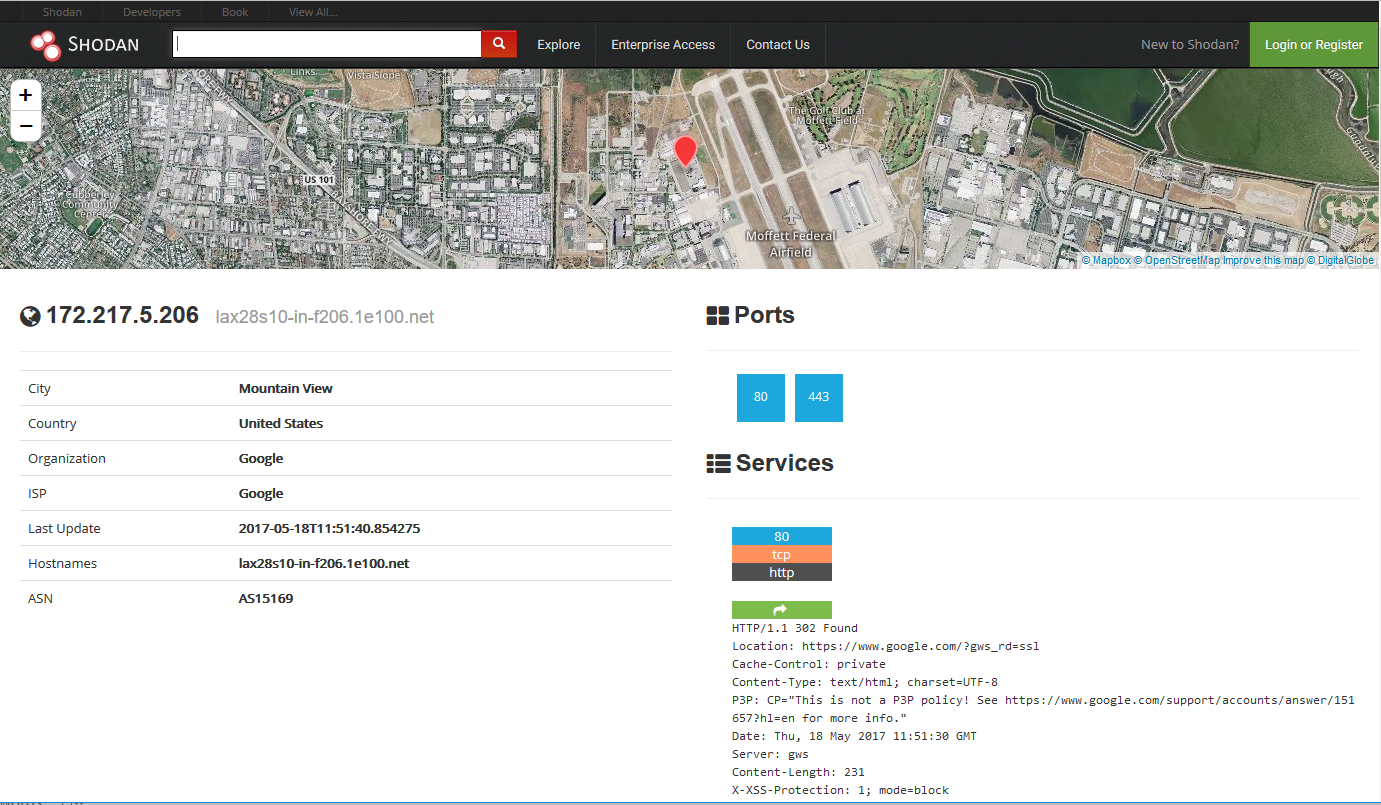
Shodan所搜集到的信息是极其惊人的。凡是链接到互联网的红绿灯、安全摄像头、家庭自动化设备以及加热系统等等都会被轻易的搜索到。Shodan的使用者曾发现过一个水上公园的控制系统,一个加油站,甚至一个酒店的葡萄酒冷却器。而网站的研究者也曾使用Shodan定位到了核电站的指挥和控制系统及一个粒子回旋加速器。
Shodan真正值得注意的能力就是能找到几乎所有和互联网相关联的东西。而Shodan真正的可怕之处就是这些设备几乎都没有安装安全防御措施,其可以随意进入。
所以如果没有必要就不要把你的设备连接到互联网,不过要知道网络上有哪些型号的设备已经被攻击了,建议大家尝试使用端口扫描之王——nmap进行扫描,端口扫描是指某些别有用心的人发送一组端口扫描消息,试图以此侵入某台计算机,并了解其提供的计算机网络服务类型(这些网络服务均与端口号相关),但是端口扫描不但可以为黑客所利用,同时端口扫描还是网络安全工作者的必备的利器,通过对端口的扫描,了解网站中出现的漏洞以及端口的开放情况。比如,像“nmap -sV -Pn -top-ports 10000 1.2.3.4/24”这样的简单扫描可以让我们快速了解攻击者可能看到的内容,利用Shodan和Censys.io这样的工具就可以做到自动搜索这些内容。
你知道你设备在网络上的运行状态吗?例如,你是否运行了IPv6,更重要的是,该运行状态是你打开的还是黑客打开的? SMBv1是否在你的环境中启用了一个设备?当你对这些运行情况有一个清晰地了解之后,请考虑一下你是否有必要禁用这些监控服务。
【慧都十四周年庆预热开启!全场满额送七级豪礼,AppleMac笔记本电脑、iwatch、iPad等您来拿!】
活动时间:10月1日-10月31日

【慧都十四周年庆预热开启!全场满额送七级豪礼,AppleMac笔记本电脑、iwatch、iPad等您来拿!】
活动时间:10月1日-10月30日
2017慧都十四周年庆预热开启!DevExpress、Telerik首推团队升级珍藏培训套包,劲省10万元!全场满额送豪礼,AppleMac笔记本电脑、iwatch、iPad、Beats耳机等好礼送送送……更多惊喜等您来探索!
2017年,一份价值百万的项目放在您面前,但一看技术需求,只好婉言拒绝?
2018年,您是否想过提升团队专业性和战斗力?
团建打造要趁早!
方案交给我们,您只管去赢千万级项目。
活动时间:2017年10月1日—2017年10月31日


C#
Smtp mailer = new Smtp();
mailer.DeliveryNotification.NotifyCondition = DsnNotifyCondition.Always;

VB.NET
Dim mailer As New Smtp()
mailer.DeliveryNotification.NotifyCondition = DsnNotifyCondition.Always
C#
mailer.DeliveryNotification.ReturnPortion = DsnReturnPortion.Header;

VB.NET
mailer.DeliveryNotification.ReturnPortion = DsnReturnPortion.Header
C# mailer.DeliveryNotification.TrackingID = "UNQIUE_STRING_q8sdf74d"; VB.NET mailer.DeliveryNotification.TrackingID = "UNQIUE_STRING_q8sdf74d"
C#
if (mailer.GetExtension("DSN") != null)
{
    Console.WriteLine("The message will be submitted with DSN support");
}
else
{
    Console.WriteLine("The message will be submitted without DSN support");
}

VB.NET
If mailer.GetExtension("DSN") IsNot Nothing Then
    Console.WriteLine("The message will be submitted with DSN support")
Else
    Console.WriteLine("The message will be submitted without DSN support")
End IfC#
// Create new MailMessage object.
MailMessage msg = new MailMessage();
msg.LoadMessage(@"C:\Temp\MyMail.eml");
msg.ConfirmReceipt = "jdoe@domain.com";
VB.NET
' Create new MailMessage object.
Dim msg As New MailMessage()
msg.LoadMessage("C:\Temp\MyMail.eml")
msg.ConfirmReceipt = "jdoe@domain.com"C#
// Create new MailMessage object.
MailMessage msg = new MailMessage();
// Load the message from .eml file
msg.LoadMessage(@"C:\Temp\MyMail.eml");
// Show the e-mail address of recipient of the read confirmation message.
Console.WriteLine("Send confirmation to " + msg.ConfirmRead);
VB.NET
' Create new MailMessage object.
Dim msg As New MailMessage()
' Load the message from .eml file
msg.LoadMessage("C:\Temp\MyMail.eml")
' Show the e-mail address of recipient of the read confirmation message.
Console.WriteLine("Send confirmation to " + msg.ConfirmRead)
 沪公网安备31011202009668号 | 沪ICP备13020027号-2